
User Guide (English)
Learn how to use TexelPaint3D for tiny-texture, low-poly painting with per-face UVs and palette-based workflows.
You can find the latest version of this document online at https://www.texelpaint3d.com/manual/en/index.html
Welcome
Texel Paint 3D (TP3D) is an innovative 3D painting tool designed for artists and developers alike. Effortlessly paint your 3D models without the burden of complex UV unwrapping and other setup steps. Just paint!
With features like precision camera control and integrated palette editing, you can create stunning low poly assets in no time. Whether you're in gaming or digital art, Texel Paint 3D is your perfect companion for inspiring creativity.
TexelPaint3D is a low-poly, texel-accurate painting tool focused on ultra-small textures (often 1 pixel per triangle) and clean, game-ready assets. When used in conjunction with your favourite modelling tool, you will have the ultimate stylized low poly workflow.
This manual walks you through installation, the user interface, core concepts, tools, and advanced workflows.
Send your feedback to feedback@texelpaint3d.com
Features
- Paint creatively, instantly. Import your model (.glb) and start painting right away, no setup required.
- No UVs, no seams, no hassle. Forget about UV unwrapping and complex material setups.
- Single draw call workflow. All your models can share one tiny texture for maximum efficiency.
- Ultra-light performance. Tiny shared textures mean minimal memory use, ideal for web and mobile games.
- Paint triangles (or quads) like pixels. Fast, intuitive, and incredibly fun, just click and colour.
- Built for stylized art. Create beautiful, modern low poly assets with crisp, clean surfaces.
- Precision camera system. Move effortlessly between model parts with Shift+F to smoothly focus any object.
- Export anywhere. Send your painted models directly to your game engine or 3D software for refinement.
- Crisp results at any zoom. Every export delivers sharp, perfectly aligned textures.
- Palette flexibility. Instantly preview your model with different colour palettes.
- Integrated palette editor. Includes a powerful built-in tool for designing and managing palettes.
- 1 pixel per triangle workflow. Compact, precise, and uniquely stylized.
- Full creative toolkit. Symmetry painting, colour-tolerant fills, angle-based fills, and more.
- Identi-Paint technology. Paint one part, all identical meshes update instantly.
- Flexible viewing. Switch between orthographic and perspective cameras with smart snap rotation.
- Mesh editing tools. Rotate or subdivide faces for added paint detail.
- Turntable previews & video exports. Instantly capture and share your creations.
- Ready to paint. Comes with curated palettes and sample 3D models so you can start creating immediately.
System Requirements
- Operating System: Windows 10 or greater
- RAM: 4GB
- CPU: Dual-core 64-bit CPU
- GPU: Integrated graphics with full OpenGL 3.3 or Vulkan 1.0 support.
Installation
- Download TexelPaint3D from the official site or store.
- Run the installer and follow the on-screen steps.
- Launch TexelPaint3D from your desktop or start menu.
First Launch
On first launch, TexelPaint3D will create default folders for palettes and sample models. These are created in C:\Users\YourName\AppData\Roaming\texelpaint
UI Overview
Main Areas
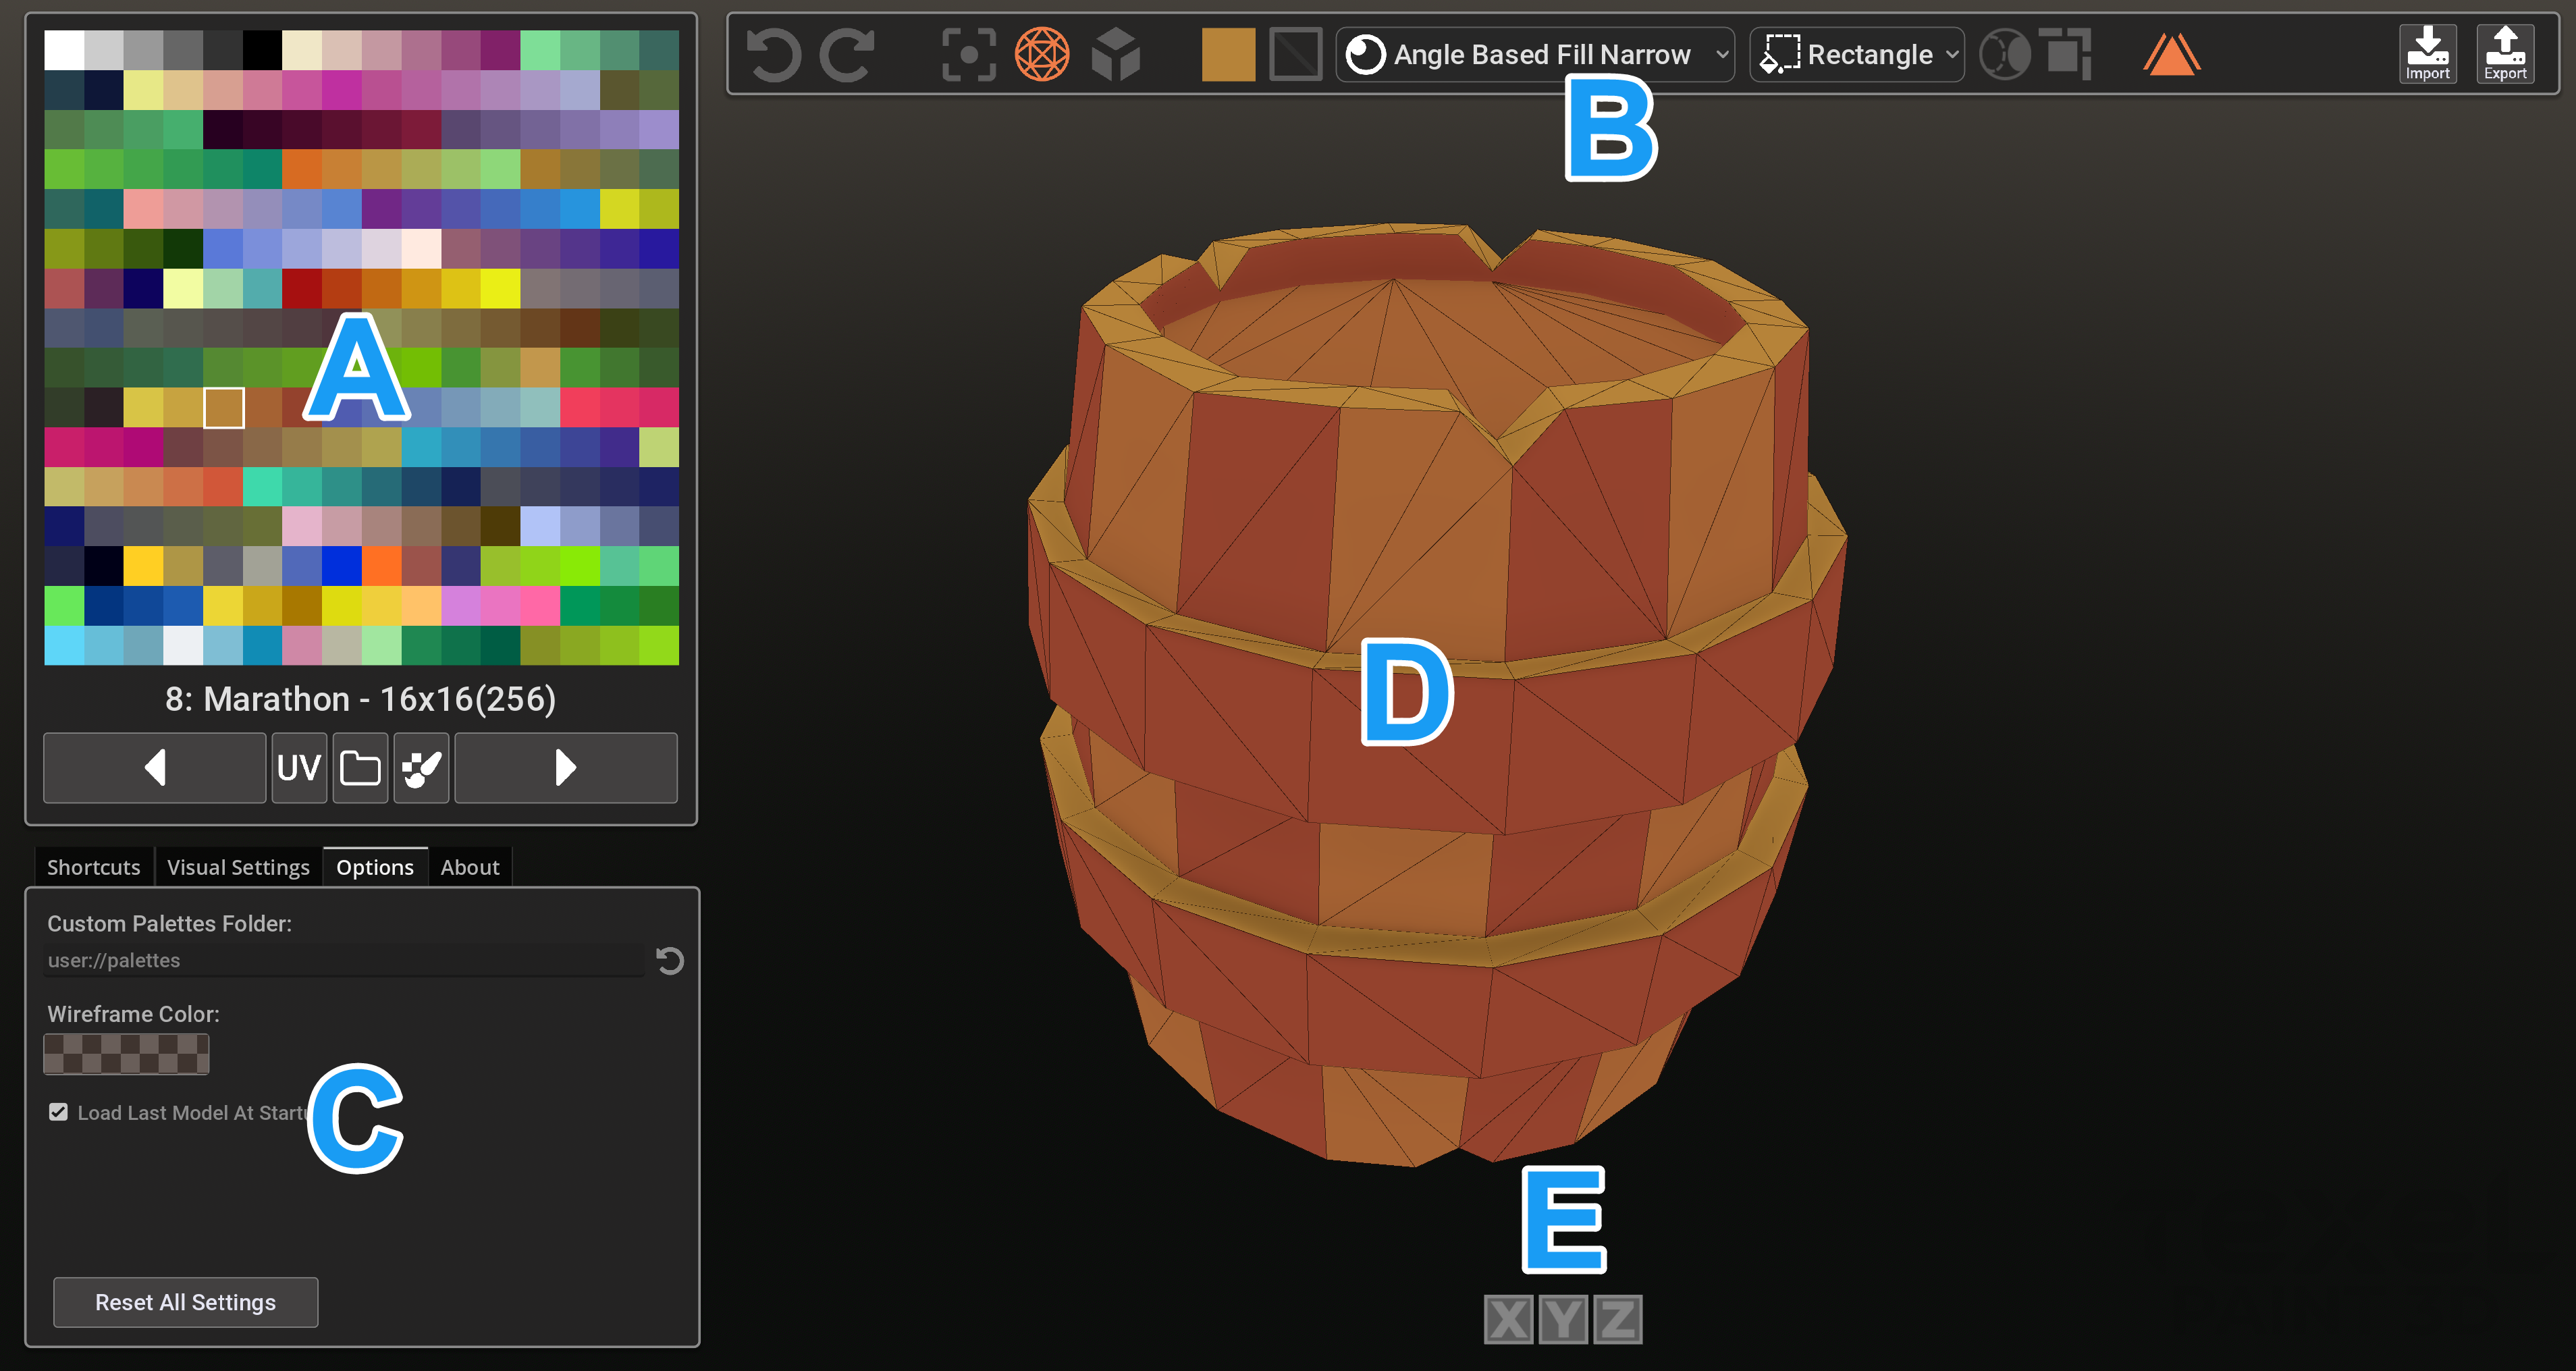
- A - Palette panel - shows your current colour palette / texture. Below it there are options to switch between palettes, display the current model's UV maps, open the palettes folder and edit palettes using the buit-in palette editting tool.
- B - Tools panel - paint modes and more. See the tools panel section below.
- C - Preferences tabs - Shortcuts, Visual Settings, Options and other information about the software.
- D - Viewport - 3D view of your current model.
- E - Symmetry Tools - Symmetry painting options.
Tools Panel

- A - Undo
- B - Redo
- C - Center Model
- D - Wireframe Toggle
- E - Perspective/Orthographic Toggle
- F - Current Selected Colour
- G - Paint Quads or Triangles
- H - Double Click Action
- I - Marquee Mode (Rectangle or Lasso)
- J - Marquee Mode - Include Backfaces Option
- K - Marquee Mode - Edge select mode
- L - Identipaint Toggle
- M - Import (*.glb or *.obj)
- N - Export (*.glb or *.obj)
Basic Workflow
- Import a low-poly mesh.
- Select colours from the current palette.
- Paint on the faces.
- Export the finished model as a .glb or .obj format along with its tiny texture.
Import/Export
Currently TP3D supports both import and export of GLB and OBJ files which should cover 99% of user requirements. The file types are discussed below. In all cases when exporting, the texture (current palette) is saved in the same folder as the exported model.
.glb
GLB is the recommended import & export format. A GLB file is a modern, all-in-one 3D format that bundles your model, materials, textures, and animations into a single compact binary file for easy sharing and real-time rendering.
.obj
An OBJ file is a simple, widely supported 3D model format that stores just the (single) mesh geometry (and
optionally a separate MTL for materials), making it ideal for basic modeling and exchange between programs.
OBJ files imported into TP3D will retain their existing UV Mapping.
Although widely supported, obj files do not contain enough data to support all of TP3D's feature set,
so we always recommend using the glb format instead.
- Obj files DO NOT contain hierarchy data or multiple meshes in any way. This means identipaint, zoom to individual mesh, fill mesh etc are not possible with .obj format.
- Can sometimes be imported at wrong scales or with inverted backfacing depending on the tool it was exported with.
Keyboard Shortcuts
🖌️ Documentation
- F1 – Open local help guide (This document)
- F2– Open/close welcome screen
🖌️ Paint Operations
- V (hold) – Colour pick from model
- Ctrl + LMB – Marquee fill
- Double click – Fill by current mode
- Shift + Double click – Fill object
🧊 View Operations
- RMB 🖱️ Right mouse – Rotate camera
- Left Alt + LMB – Rotate camera
- Shift + Rotate – Snap to angles
- Space or Middle mouse – Pan camera
- F – Focus on model. This will frame all meshes of the model.
- Shift + F – Focus on model under cursor. Used to frame each sub-mesh of the overall model.
- WASD - Free fly camera
- 1 – Toggle wireframe
- U – Toggle UV display
- 5 – Perspective / Orthographic toggle
- Tab – Preview turntable without user interface
- Shift + Tab – Preview turntable with user interface
📐 Mesh Operations
- R – Rotate triangle
- E – Subdivide face
- Ctrl + M – Reset mesh changes
Basic Paint Tools
TP3D makes it easy to paint your model quickly. Double click to fill large areas based on the current paint fill mode or use double click and shift to fill whole sub-meshes with a single colour.
Brush
By pressing the left mouse button and dragging, each polygon will be painted with the currently selected palette colour. You can choose to paint by complete quads or by triangles by switching the 'Paint Quads or Triangles' button in the main toolbar.
Colour Tolerant Fill
Using double click with this paint mode, this fill simply fills an area of connected polygons that share the same colour.
Fill By Angle
This tool fills an area of the model based on the angles of the faces. It is helpful to use this tool to fill flat areas without allowing the colour to bleed off the edges. You should experiment with the different angles to find the one suitable for the task in hand.
Selection & Marquee
As well as the basic tools you can fill large specific areas using the marquee tools. Choose from lasso or rectangle, hold Ctrl and drag to draw an outline around the polygons you wish to fill.
Additional options in the main toolbar permit the marquee tool to also include backfaces (faces behind the model not seen by the user) and also the option whether to include only polygons fully within the marquee or those that also cross it.
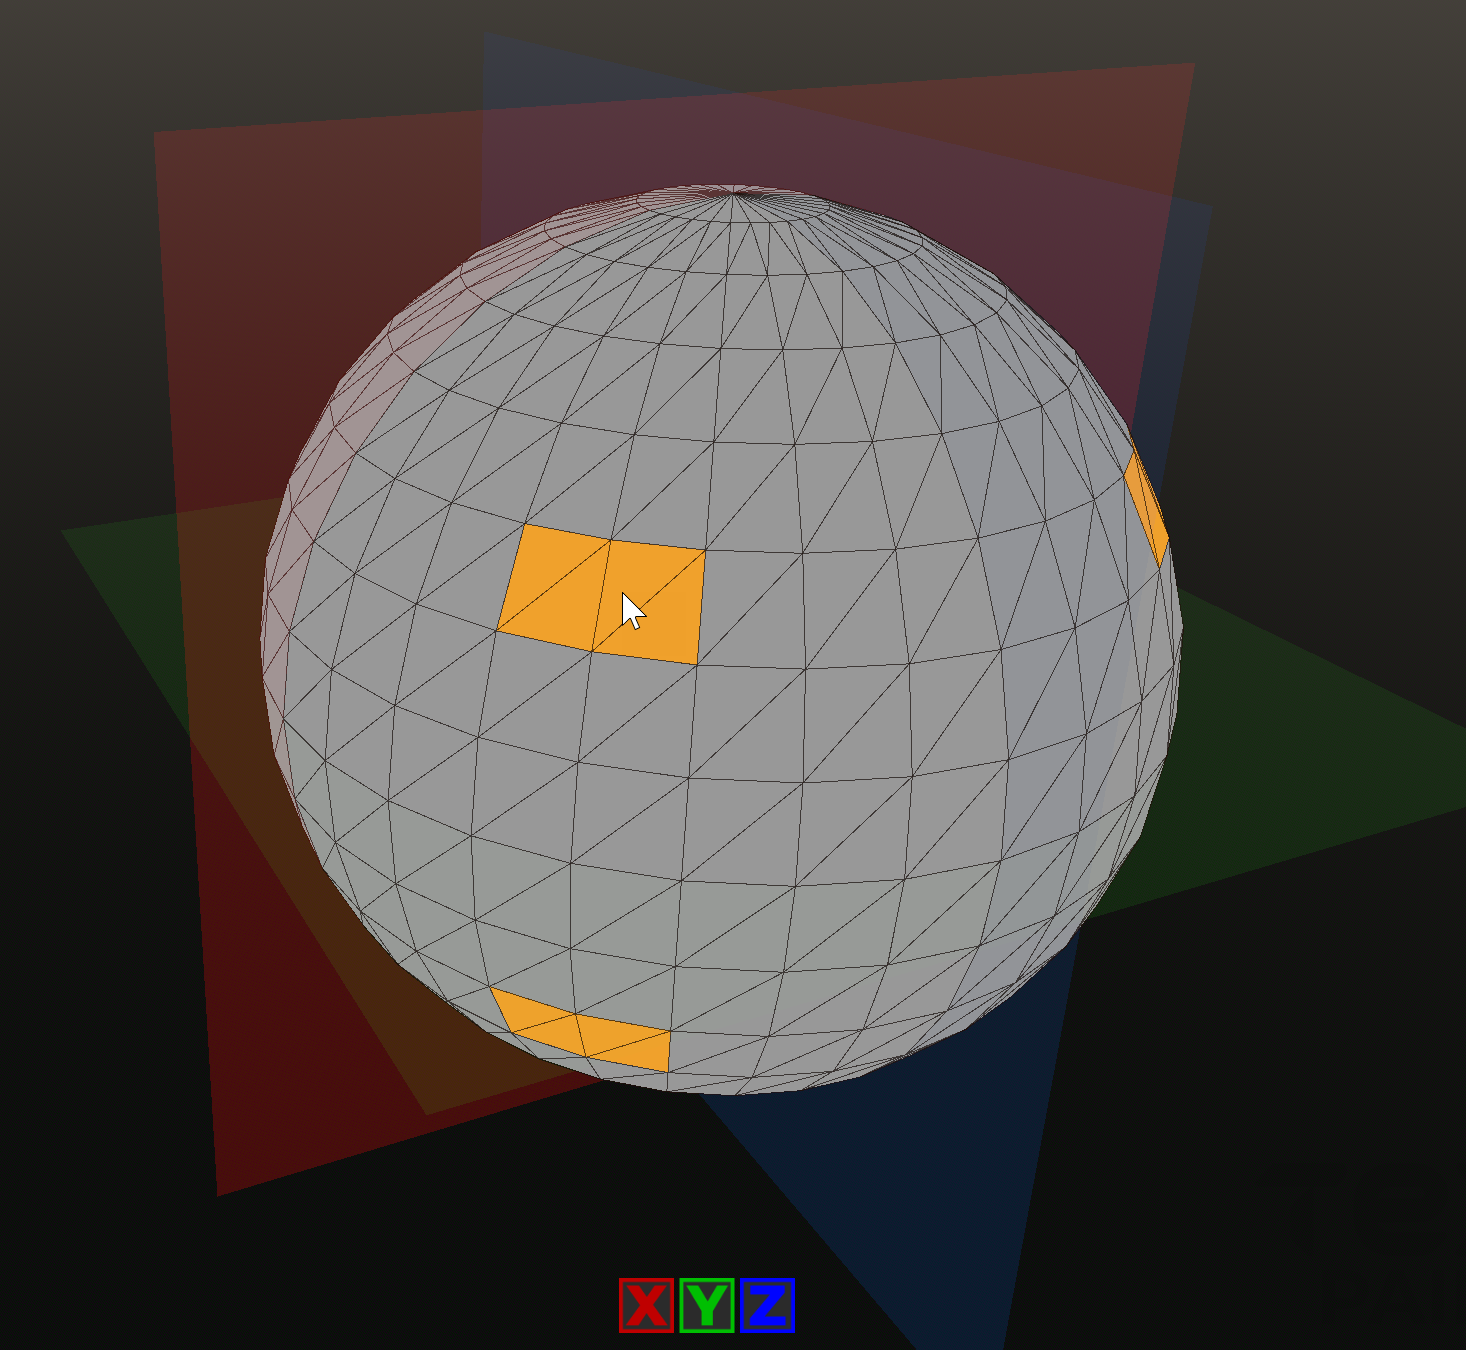
Symmetry
It's common for many models to be symmetric, so its often useful to only have to paint one half and let TP3D do the rest.
You can toggle paint symmetry in each of the axis using the buttons at the bottom of the viewport. Use them one at a time or combine them depending on your needs. When active, a symmetry plane for each axis will be shown to guide you.
Palettes & Texels
TP3D lets you paint models one face or quad at a time with individual pixel colours defined in a palette.
Palettes are a square image (.png or .jpg) which can be from a 4x4 (16 colours) pixel image up to a maximum of 32x32 (1024 colours)
A number of palettes come readily installed with TP3D, but you are encouraged to create your own either by using images or using a palette creation tool such as Fast Palette Studio; which comes pre-installed as part of TP3D.
Palettes are a core part of TP3D and it is important to understand that in terms of this software the palette is simply a texture that will be exported along with the current model. If you are a game developer you could then use this individual texture in a single material that is shared across hundreds of objects in your game saving you a lot of memory and minimizing draw calls.
Organizing Palettes
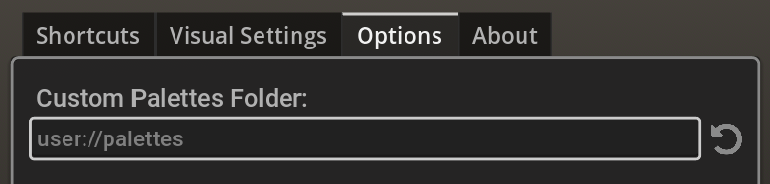
At any time you can add/remove or rename palettes in the default folder, but it is often better to create a custom folder or multiple custom folders for your palettes.
To open the current palette directory in Windows you can press the button under the palette tool. From here you can see each texture file and you can drop in, delete or rename as you wish. You can also create additional folders in any location, but in order for TP3D to use that folder, you will need to set that folder path in the options tab.
To change the path, simply click on the path input area and choose a new folder using the Windows dialogue.
Palette Design Tool
You can create your palettes with any tool or image file but included with TP3D is a custom version of Fast Palette Studio.
Fast Palette Studio allows you to quickly create palettes and export them both as png image format (as used in TP3D) or as .gpl (GIMP Palette) format for use in other tools and pixel editing software.
Although the palette tool is a separate program, you can directly open it from within TP3D by pressing the relevant button in the palette panel.
IdentiPaint / Multi-Mesh Painting
Identipaint lets you paint multiple objects of the same type as if they were one object. This is a useful time-saving feature exclusive to TP3D.
To best explain the benefit of this feature let's imagine that we have imported a model of a train. The train has many wheels and it would take a long time to paint each one individually. You could of course just import the model with just one wheel and then duplicate it in your modelling tool of choice, but TP3D makes it easier. Simply switch on the Identipaint toggle and then as you paint one wheel, all the other wheels will be painted at the same time.
Mesh Operations
We have included the ability to modify your mesh in small ways that makes it easier to paint your models without having to go back and forth between your modelling tool and TP3D.
Sub-Divide Face - E
Using this function you can divide individual faces for more detailed painting in focused areas. Each time you press this button the face that your mouse pointer is hovering over will be sub-divided. Although you can get spectacular results with this tool, you should use with caution as it obviously adds additional polygons to your model.
Rotate Triangle - R
Sometimes your triangle edges may not be rotated as you wish and you would like the colours to be painted in a different direction. Each time you press this button the face that your mouse pointer is hovering over will be rotated clockwise.
Reset Mesh Changes
Although you can undo each mesh adjustment step at any time using the undo functionality, you can choose to undo all mesh operations in one go by selecting this option. Warning! Paint will remain and so any painted areas that you worked on while modifying the mesh previously may need to be looked at.
Tips
- Keep poly counts low for faster painting.
- Group assets logically in your modelling tool.
- The V Key is your best friend.
- Use Shift + F to quickly switch between sub-meshes.
Troubleshooting
Coming soon...
...
FAQ
Coming Soon...